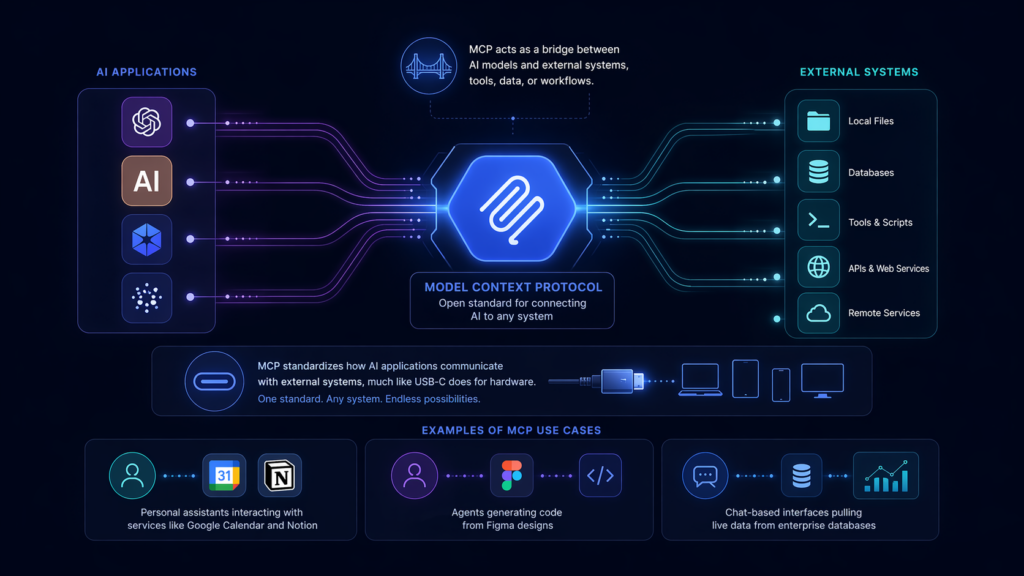
MCP (Model Context Protocol) is an open-source standard that allows AI applications to connect to external systems in a structured and consistent way. It acts as a bridge between AI models and external tools, data sources, or workflows.
With MCP, applications like ChatGPT or Claude can access local files, query databases, run tools, or interact with APIs, expanding what these models can do by giving them direct access to useful context and capabilities.
The protocol standardizes how AI applications communicate with external systems, much like USB-C does for hardware. This enables consistent integration with both local and remote services, making it easier for developers to connect their AI systems to complex infrastructure.
Examples of MCP use cases include personal assistants interacting with services like Google Calendar and Notion, agents generating code from Figma designs, or chat-based interfaces pulling live data from enterprise databases.
MCP uses a client-server model where AI applications, known as MCP hosts, connect to one or more MCP servers through dedicated MCP clients. Each client maintains a persistent connection with a server, enabling the host to access different kinds of contextual data or actions. For example, Visual Studio Code may connect to several MCP servers at once (such as a local filesystem or a remote error-tracking system) using a separate client for each.
The protocol is divided into two main layers. The transport layer handles the mechanics of communication and supports two methods: stdio for local, high-performance connections, and streamable HTTP for remote servers with support for streaming and authentication. The data layer sits above this and uses JSON-RPC 2.0 to define how clients and servers exchange messages.
The most critical concept in MCP is its primitives, which define what capabilities a server or client can expose. Server-side primitives include:
Tools: Functions AI models can execute (e.g., API calls, database queries)
Resources: Context data the model can use (e.g., file contents, schema metadata)
Prompts: Templates for guiding model behavior or interactions
Client-side primitives allow the server to request model outputs (sampling), interact with the user (elicitation), or send logs for monitoring (logging).
MCP also supports notifications, allowing servers to inform clients in real-time when available tools or context change. Additionally, experimental tasks provide durable wrappers for long-running operations, enabling result tracking and asynchronous workflows.
By combining a structured communication protocol with flexible primitives, MCP allows AI systems to operate more effectively in real-world, multi-system environments.
Try Obot Today
Click here to check out Obot’s Hosted MCP Platform for free, or visit GitHub to deploy our open-source gateway on your own infrastructure.
MCP Tutorial #1: Build an MCP Server
In this tutorial, you’ll build a simple MCP server that provides weather data to an AI client. The server will expose two tools, get_alerts and get_forecast, allowing an AI model to fetch active weather alerts for a US state or get a weather forecast for a given location. The tutorial uses Python with the FastMCP framework and connects the server to Claude for Desktop.
Instructions are adapted from the official MCP specification website.
Step 1: Set Up Your Environment
Start by installing the uv package manager and initializing a new project:
@mcp.tool()
async def get_alerts(state: str) -> str:
    url = f"{NWS_API_BASE}/alerts/active/area/{state}"
    data = await make_nws_request(url)
    if not data or "features" not in data:
        return "Unable to fetch alerts or no alerts found."
    if not data["features"]:
        return "No active alerts for this state."
    alerts = [format_alert(feature) for feature in data["features"]]
    return "\n---\n".join(alerts)

@mcp.tool()
async def get_forecast(latitude: float, longitude: float) -> str:
    points_url = f"{NWS_API_BASE}/points/{latitude},{longitude}"
    points_data = await make_nws_request(points_url)
    if not points_data:
        return "Unable to fetch forecast data for this location."
    forecast_url = points_data["properties"]["forecast"]
    forecast_data = await make_nws_request(forecast_url)
    if not forecast_data:
        return "Unable to fetch detailed forecast."
    periods = forecast_data["properties"]["periods"]
    forecasts = []
    for period in periods[:5]:
        forecast = f"""
{period["name"]}:
Temperature: {period["temperature"]}°{period["temperatureUnit"]}
Wind: {period["windSpeed"]} {period["windDirection"]}
Forecast: {period["detailedForecast"]}
"""
        forecasts.append(forecast)
    return "\n---\n".join(forecasts)
Step 4: Run the Server
Finish the script with a main() function to launch the server over stdio:
def main():
    mcp.run(transport="stdio")

if __name__ == "__main__":
    main()
Use uv run weather.py to start the server.
Step 5: Connect to Claude for Desktop
To test the server with Claude for Desktop, edit the configuration file at:
Replace the path with the full path to your server directory. Restart Claude for Desktop, and the weather server should appear under the Connectors menu.
Step 6: Test the Integration
Try running commands like:
“What’s the weather in Philadelphia?”
“What are the active weather alerts in Chicago?”
Claude will decide which tool to invoke, call it through MCP, and return the results in natural language.
MCP Tutorial #2: Writing and Connecting a Custom MCP Client
In this tutorial, you’ll build a custom MCP client that connects to an existing MCP server, lists its available features, and invokes tools, resources, or prompts. Writing your own client allows for programmatic control over MCP servers, enabling automation and deeper integration into your applications.
Step 1: Choose Your Language and Set Up
MCP clients can be written in various languages, including TypeScript, Python, .NET, Java, and Rust. Each language has its own SDK or library setup.
For example, to use the TypeScript client SDK:
npm install @modelcontextprotocol/sdk
Or for Python:
pip install mcp
Make sure the server you plan to connect to is already implemented and available locally or remotely.
Step 2: Import Required Libraries
Import the client and transport modules for your language of choice.
using ModelContextProtocol.Client;
using ModelContextProtocol.Protocol.Transport;
12
from mcp import ClientSession, StdioServerParameters
from mcp.client.stdio import stdio_client
12
use rmcp::transport::TokioChildProcess;
use tokio::process::Command;
12
import { Client } from "@modelcontextprotocol/sdk/client/index.js";
import { StdioClientTransport } from "@modelcontextprotocol/sdk/client/stdio.js";
Step 3: Create the Client and Connect to the Server
Set up the transport method (typically stdio for local processes), then create and connect the client.
123456789
identifiers
WebClient webClient = WebClient.builder()
        .baseUrl("http://localhost:8080")
        .build();

WebFluxSseClientTransport sseTransport = new WebFluxSseClientTransport(WebClient.builder().baseUrl("http://localhost:8080"));

var mcp = McpClient.sync(sseTransport).build();
mcp.initialize();
1234567
var transport = new StdioClientTransport(new StdioClientTransportOptions
{
    Command = "dotnet",
    Arguments = new List<string> { "run", "--project", "path/to/server.csproj" }
});

var client = await McpClientFactory.CreateAsync(transport);
12345
params = StdioServerParameters(command="python", args=["server.py"])

async with stdio_client(params) as (r, w):
    async with ClientSession(r, w) as client_session:
        await client_session.initialize()
1234567
let server_path = std::path::Path::new(env!("CARGO_MANIFEST_DIR"))
    .join("calculator-server");

let mut cmd = Command::new("cargo");
cmd.arg("run").current_dir(&server_path);

let client = ().serve(TokioChildProcess::new(cmd)?).await?;
Obot provides a centralized gateway for managing all your MCP servers in one place, with built-in hosting, access control, monitoring, and discovery. Instead of juggling disconnected services or worrying about security gaps, you get a unified control plane where you can onboard servers, define policies, and track usage across your entire organization.
With Obot, you can:
Host and manage MCP servers (local, remote, or internal) through a single interface
Control access with fine-grained policies so only the right users and agents can connect
Offer a searchable MCP catalog with documentation and verified integrations
Monitor usage and audit activity to maintain governance and security
Connect instantly to tools like Claude, VS Code, or custom agents
In short, Obot turns a collection of individual servers into a scalable, production-ready platform.
If you’re serious about using MCP in real applications, this is the next step.
👉 Try Obot today and start managing your MCP servers the right way.